Monday, July 27, 2020

July WLS Critical Patch Patch 31178492: WLS PATCH SET UPDATE 10.3.6.0.200714


Section 1: Preparing to Install WLS Patch Set Update 10.3.6.0.200714


- WebLogic Server Patch Set Update (PSU) can be applied on a per-domain basis (or on a more fine-grained basis), Oracle recommends that PSU
  be applied on an installation-wide basis. PSU applied to a WebLogic Server  installation using this recommended practice affect all domains and
  servers sharing that installation.

- Stop all WebLogic server processes

- Remove any previously applied WebLogic Server Patch Set Update and associated overlay patches

- Update Java SE (JDK/JRE):
  For users of Oracle JDKs and JVMs, we strongly recommend applying the latest Java 7 Critical Patch Updates (CPUs) as soon as they are released.

  Certain WebLogic Server fixes for deserialization vulnerabilities that are provided in WebLogic Server Patch Set Updates (PSUs) depend on
  JEP 290 filtering and JEP 290 global scope filtering features provided in July 2018 JDK Updates and later JDK updates.
  These WebLogic Server fixes for deserialization vulnerabilities are not effective without these JDK updates, or later JDK updates.
  Oracle strongly recommends that you ensure WebLogic Server is running with a supported JDK version, and the following JDK update level at a minimum:

  JDK 7 Update 191 (JDK 7u191) or later (for WebLogic Server versions that are supported on JDK 7)

  Refer to the following for further information: Doc ID 1506916.1 Obtaining Java SE (JDK/JRE) for Oracle Fusion Middleware Products

- If you are running with a security manager and experience java.io.SerializablePermission "serialFilter" permission exceptions, then you will need to
  update the weblogic policy file to include the following line:

  permission java.io.SerializablePermission "serialFilter";
 
  in the coherence.jar section of the weblogic policy file:
 
  grant codeBase "file:@WL_HOME/../coherence/lib/coherence.jar" {

Section 2: Installing WLS Patch Set Update 10.3.6.0.200714

- Unzip p31178492_1036_Generic.zip to {MW_HOME}/utils/bsu/cache_dir or any local directory  

  Where, MW_HOME is path of the Oracle Middleware Home.
 
  Note: You must make sure that the target directory for unzip has required write and executable permissions
           for "user" with which the component being patched is installed.
 
- Navigate to the {MW_HOME}/utils/bsu directory.

- Apply WLS BSU (Smart Update) fix for quicker patch application. This step can be skipped if the fix is already applied.
  https://support.oracle.com/epmos/faces/DocumentDisplay?id=2271366.1 
 
- Configuring Memory options
 
   For Microsoft Windows systems
   Edit the bsu.cmd script and change memory options as follows:
   set MEM_ARGS=-Xms1024m -Xmx4096m
 
   For UNIX Systems
   Edit the bsu.sh script and change memory options as follows:
   MEM_ARGS="-Xms1024m -Xmx4096m"
 
- Execute bsu.sh -install -patch_download_dir={MW_HOME}/utils/bsu/cache_dir -patchlist={PATCH_ID} -prod_dir={MW_HOME}/{WL_HOME}
 
  Where, WL_HOME is the path of the WebLogic home,
             PATCH_ID is I37G (Unique identifier for WLS Patch Set Update 10.3.6.0.200714).
 
Reference:
How to Apply WebLogic Server (WLS) Patches Using Smart Update
https://support.oracle.com/epmos/faces/DocumentDisplay?id=876004.1
 
BSU Command line interface
http://docs.oracle.com/cd/E14759_01/doc.32/e14143/commands.htm

Section 3: Troubleshooting Patching Failures

WebLogic Server PSU - Popular Known Issues (Doc ID 2458832.1)
https://support.oracle.com/epmos/faces/DocumentDisplay?id=2458832.1
 
WLS BSU (Smart Update) Takes a Very Long Time to Apply Patches - Especially When Checking for Patch Conflicts
https://support.oracle.com/epmos/faces/DocumentDisplay?id=2271366.1
 
Diagnosing "Encountered unrecognized patch ID" Failures When Trying to Patch WLS Using BSU
https://support.oracle.com/epmos/faces/DocumentDisplay?id=1186923.1
 
Conflict Detected - New PSU for WLS 10.3.6 is "mutually exclusive and cannot coexist with patch(es)"
https://support.oracle.com/epmos/faces/DocumentDisplay?id=2267696.1
 
Native Windows Zip/Unzip Tools Fail to Extract Patch Zip Files - "Path Too Long" or "is Invalid" Errors
https://support.oracle.com/epmos/faces/DocumentDisplay?id=2259579.1

Section 4: Post-Installation Instructions

1. Restart all WebLogic servers.
2. The following command is a simple way to verify the successful installation of WebLogic Server PSU patch 10.3.6.0.200714.

            $ . $WL_HOME/server/bin/setWLSEnv.sh
            $ java weblogic.version

    In the following example output, 10.3.6.0.200714 is the installed WebLogic Server PSU.
    WebLogic Server 10.3.6.0.200714 PSU Patch for BUG31178492

3. A note about the weblogic.policy file *

   If you are using a Java security manager (for example, you use -Djava.security.manager to start up WebLogic Server),
   you must ensure that the codeBase in your policy file points to the location where the patches are installed.
   The policy file is specified by -Djava.security.policy during server startup.
   By default, this is weblogic.policy file and resides in WL_HOME/server/lib, where WL_HOME is the WebLogic Server installation directory.
 
   This is an example of what should be added to the weblogic.policy file for the installed patches:
 
   grant codeBase "file:<path-to-WLS-patch-jars>/patch_wls1036/patch_jars/-" {
        permission java.security.AllPermission;
   };
 
  The default weblogic.policy file is a sample. If you use it, you must modify it. Refer to the following URL for additional information:
 
  http://download.oracle.com/docs/cd/E17904_01/web.1111/e13711/server_prot.htm  
 
4. A note about FMW 11g installations using PSU patch 10.3.6.0.200714 or later versions.

   You may see this error after starting the Admin Server :

   "Unable to Read Logging Configuration from File 'logging.xml' exception: oracle.core.ojdl.logging.LoggingConfigurationException:     ODL-52050"
    or
   <BEA-149231> <Unable to set the activation state to true for the application 'SHAREDSERVICES [Version=11.1.2.0]'.

   Please consult this KM Note to evaluate your situation:
   https://support.oracle.com/rs?type=doc&id=2604499.1   

5. If your deployed application uses Java deserialization you may need to customize the WebLogic JEP 290 Default Filter.

   For further information, refer to the "Restrict incoming serialized Java objects." line in the Securing Network Connections table at
   https://docs.oracle.com/middleware/11119/wls/LOCKD/GUID-E5E57EA2-90AC-49E5-AF35-E217B8980BDC.htm#GUID-9A5D9EE1-BE59-475C-BF61-19D4EFC6EDFF   

    Section 5: Uninstalling WLS Patch Set Update 10.3.6.0.200714

     - Stop all WebLogic Servers
     - Navigate to the {MW_HOME}/utils/bsu directory.
     - Execute bsu.sh -remove -patchlist={PATCH_ID} -prod_dir={MW_HOME}/{WL_HOME}

    Section 6: Post-Uninstallation Instructions

    - Restart all WebLogic Servers

    Thursday, June 4, 2020

    Error Connecting to Essbase from a Client: "Network error [10061]: Failed to connect to [xxxxx:1423]"

    Hi All,

    We have below issue while connecting to Essbase server through EAS/ while creating Planning Datasource.

    "

    Error Connecting to Essbase from a Client: "Network error [10061]: Failed to connect to [xxxxx:1423]"


    I validated all the Hyperion services , DB Services and in the Weblogic console too but all are working as expected but I could not access the Essabase server.

    After Troubleshooting for 1 hr I got to know that host file path is not available on the environment variable path which is causing the EAS is trying to validate the host name

    Edit the "PATH" variable and check "C:\Windows\System32\drivers\etc\hosts" is available


    Wednesday, May 27, 2020

    Unable to see the HFM Manage Journal Action menu items from Oracle SmartView

    Hello All,

    This Article helps you for those who are recently upgraded the MS Office/ OS and Installed the Oracle SmartView from thier IT Team and doesnt have full access to the system as we see normally.


    If any user is unable to see the Action Menus from Manage Journal in SmartView as below,

    Please ask you IT Team to Install "JE installer add in for excel!" and issue will fix.


    Wednesday, May 20, 2020

    How to Apply April 2020 Weblogic Critical Patch & JDK Upgrade

    Hello

    I would like to share this with you since I wasted a lot time due to the lack of Linux knowledge when Hyperion products Installed on Linux machines.

    I have upgraded JDK 6 to JDK 7 for the compatibility of April 2020 Weblogic Critical Patch and after upgrading on both Linux and Windows Machines I could not start the Weblogic Console in Linux machines.

    The user which I am using as service account does not have super user access and Weblogic Console is unable to access JAVA.exe file from the JDK folder. It took me some time that we should have write access to the Java file which is existed in the JDK bin folder as below.

    How to update the write access using Linux command "chmod  a+x  java"

    Please follow the below url as a reference when there is any upgrade in the JDK & Weblogic

    "https://knowepmbi.wordpress.com/2019/11/28/how-to-configure-an-existing-epm-11-1-2-4-with-java-7-2/"


    Documentation for apply April Weblogic Patch :
    #################################################################################################################
    Used Documentation:
    Enhancement for WLS BSU (Smart Update): Resolves Very Long Time to Apply Patches - Especially When Checking for Patch Conflicts (Doc ID 2271366.1)
    Critical Patch Update (CPU) Program April 2020 Patch Availability Document (PAD) (Doc ID 2602410.1)
    #################################################################################################################
    Servers:LabEnvt
    Patch Name:
    Patch 30463097: SU PATCH [JWEB] : WLS PATCH SET UPDATE 10.3.6.0.200114
    Patch 27238412: SMART UPDATE TOOL ENHANCEMENT V3
    Patch 29888337: Oracle SERVER JRE 7 Update 221 b35

    ==========================================
    1) Hyperion Weblogic current version (Win)
    ==========================================
    Servers:LabEnvt

    D:\LavEnvt\hyperion\wlserver_10.3\server\bin\setWLSEnv.cmd
    java weblogic.version
    ---
    WebLogic Server 10.3.6.0  Tue Nov 15 08:52:36 PST 2011 1441050

    ==========================================
    2) Hyperion Weblogic current version (Lin)
    ==========================================
    Servers:LabEnvt
    . /LabEnvt/hyperion/wlserver_10.3/server/bin/setWLSEnv.sh
    java weblogic.version
    ---
    WebLogic Server 10.3.6.0  Tue Nov 15 08:52:36 PST 2011 1441050

    #############################################################################################################################
    3) PPA for:
    Patch 30463097: SU PATCH [JWEB] : WLS PATCH SET UPDATE 10.3.6.0.200114
    Patch 27238412: SMART UPDATE TOOL ENHANCEMENT V3
    #############################################################################################################################

    PATCH_ID - JWEB
    Patch number - 30463097

    ==================
    Preparation steps
    ==================
    Files downloaded to:
    D:\LabEnvt\hyperion\utils\bsu\p30463097_1036_Generic.zip
    D:\LabEnvt\hyperion\utils\bsu\p27238412_1036_Generic.zip
    /LabEnvt/hyperion/utils/bsu/p30463097_1036_Generic.zip
    /LabEnvt/hyperion/utils/bsu/p27238412_1036_Generic.zip

    -----------------------------------------------
    edit bsu.bat file

    Change:
    MEM_ARGS="-Xms2048m -Xmx2048m"
    -----------------------------------------------
    Apply bsu 27238412 update

    D:\LabEnvt\hyperion\utils\bsu>bsu -version
    Oracle Smart Update. Version: 3.3.0.0

    D:\LabEnvt\hyperion\utils\bsu>bsu_update.bat install

    Output should be:
    Updating bsu modules
            1 file(s) copied.
            1 file(s) copied.
            1 file(s) copied.

    -----------------------------------------------
    Check for applied patches:

    cd /d D:\LabEnvt\hyperion\utils\bsu
    bsu.cmd -prod_dir=D:\LabEnvt\hyperion\wlserver_10.3 -status=applied -verbose -view
    ---
    ProductName:       WebLogic Server
    ProductVersion:    10.3 MP6
    Components:        WebLogic Server/Core Application Server,WebLogic Server/Admi
                       nistration Console,WebLogic Server/Configuration Wizard and
                       Upgrade Framework,WebLogic Server/Web 2.0 HTTP Pub-Sub Serve
                       r,WebLogic Server/WebLogic SCA,WebLogic Server/WebLogic JDBC
                        Drivers,WebLogic Server/Third Party JDBC Drivers,WebLogic S
                       erver/WebLogic Server Clients,WebLogic Server/WebLogic Web S
                       erver Plugins,WebLogic Server/UDDI and Xquery Support,WebLog
                       ic Server/Evaluation Database,WebLogic Server/Workshop Code
                       Completion Support
    BEAHome:           D:\LabEnvt\hyperion
    ProductHome:       D:\LabEnvt\hyperion\EPMSystem11R1\..\wlserver_10.3
    PatchSystemDir:    D:\LabEnvt\hyperion\utils\bsu
    PatchDir:          D:\LabEnvt\hyperion\patch_wls1036
    Profile:           Default
    DownloadDir:       D:\LabEnvt\hyperion\utils\bsu\cache_dir
    JavaVersion:       1.6.0_29
    JavaVendor:        Sun
    =================================================================================================================

    ============
    Action plan
    ============

    ===========================
    Stop all Weblogic servers
    ===========================
    Stop all services according documentation.

    =====================
    Apply PSU patch (Lin)
    =====================
    Servers:LabEnvt

    cd /LabEnvt/hyperion/utils/bsu/
    ./bsu.sh -install -patch_download_dir=/LabEnvt/hyperion/utils/bsu/cache_dir -patchlist=JWEB -prod_dir=/LabEnvt/hyperion/wlserver_10.3
    - Message should be similar to:
    -------------------------
    Checking for conflicts.
    No conflict(s) detected

    Starting installation of Patch ID: JWEB
    Installing /LabEnvt/hyperion/utils/bsu/cache_dir/JWEB.jar
    Result: Success

    - Check if patch is applied:
    . /LabEnvt/hyperion/wlserver_10.3/server/bin/setWLSEnv.sh
    java weblogic.version
    ---
    - Output should be:
    WebLogic Server 10.3.6.0.200114 PSU Patch for BUG****

    =====================
    Apply PSU patch (Win)
    =====================
    cd D:\LabEnvt\hyperion\utils\bsu
    .\bsu.cmd -install -patch_download_dir=D:\LabEnvt\hyperion\utils\bsu\cache_dir -patchlist=JWEB -prod_dir=D:\LabEnvt\hyperion\wlserver_10.3
    - Message should be similar to:
    -------------------------
    Checking for conflicts.
    No conflict(s) detected

    Starting installation of Patch ID: JWEB
    Installing D:\LabEnvt\hyperion\utils\bsu\cache_dir\JWEB.jar
    Result: Success

    - Check if patch is applied:
    D:\LabEnvt\hyperion\wlserver_10.3\server\bin\setWLSEnv.cmd
    java weblogic.version
    ---
    - Output should be:
    WebLogic Server 10.3.6.0.200114 PSU Patch for BUG****


    ================================
    Check if all patches are applied
    ================================
    cd /d D:\LabEnvt\hyperion\utils\bsu
    bsu.cmd -prod_dir=D:\LabEnvt\hyperion\wlserver_10.3 -status=applied -verbose -view

    ===========================
    Start all Weblogic servers
    ===========================
    Start all services according documentation.

    ====================
    Validate application
    ====================
    Run validation reports
    Check URL's
    Check monitors

    ================
    Update JDK Linux
    ================

    Extract server-jre-7u221-<OS_VERSION>.tar.gz from the patch to the <MIDDLEWARE_HOME> directory. There is no need to install Java, you can just lift the binaries into place.
    Create links in the Middleware directory so that both Oracle/Middleware/jdk160_35 and Oracle/Middleware/jrockit_160_37 both refer to jdk1.7.0_221
    On Unix:
     From a shell prompt change directory to /Oracle/Middleware and execute the following two commands:
    ln -s jdk1.7.0_221 jdk160_35
    ln -s jdk1.7.0_221 jrockit_160_37

    Change directory to /Oracle/Middleware/user_projects/epmsystem1/bin/deploymentScripts and backup all scripts.  Modify each of the setCustomParamsProduct.sh scripts and add the -XX:+UnlockCommercialFeatures option before the existing -XX:-FlightRecorder parameter.  In Java 7 you need to add the -XX:+UnlockCommercialFeatures parameter in order to use FlightRecorder.

    Linux:
    Make a backup of the setEmpEnv.sh (Unix) file and then make the following modification:
    Change: set JAVA_OPTIONS=%JAVA_OPTIONS%
    To: set JAVA_OPTIONS=-XX:+UnlockCommercialFeatures -XX:-FlightRecorder %JAVA_OPTIONS%


    ==================
    Update JDK Windows
    ==================

    Extract server-jre-7u221-<OS_VERSION>.tar.gz from the patch to the <MIDDLEWARE_HOME> directory. There is no need to install Java, you can just lift the binaries into place.
    Create links in the Middleware directory so that both Oracle/Middleware/jdk160_35 and Oracle/Middleware/jrockit_160_37 both refer to jdk1.7.0_221
    On Windows:
    Rename these folders jdk160_35 and jrockit_160_37 under \Oracle\Middleware folder (Note: Need to stop services to perform this step)
    From a cmd prompt change directory to \Oracle\Middleware and execute the following two commands:
    mklink /D jdk160_35 jdk1.7.0_221
    mklink /D jrockit_160_37 jdk1.7.0_221
    Change Directory to \Oracle\Middleware\jdk1.7.0_221\jre\bin and execute the following command
    mklink /D jrockit server

    Change directory to /Oracle/Middleware/user_projects/epmsystem1/bin/deploymentScripts and backup all scripts.  Modify each of the setCustomParamsProduct.bat scripts and add the -XX:+UnlockCommercialFeatures option before the existing -XX:-FlightRecorder parameter.  In Java 7 you need to add the -XX:+UnlockCommercialFeatures parameter in order to use FlightRecorder.
    Failure to add the new option may result in your WebLogic Web Apps failing to start.
    The following steps are necessary to run the WebLogic Admin Server and to be able to start an App via the startManagedWebLogic.cmd script.  All Windows Services should already be functional at this point.
    Change directory to D:\Oracle\Middleware\user_projects\domains\EPMSystem\bin
    Windows ONLY:
    Make a backup of the startWebLogic.cmd file and then make the following modification:
    Add the line set JAVA_VM=-server directly below the line that reads @REM START WEBLOGIC
    Example:
    @REM START WEBLOGIC
    set JAVA_VM=-server
    Make a backup of the setDomainEnv.cmd file and then make the following modification:
    Change: set EXTRA_JAVA_PROPERTIES=%EXTRA_JAVA_PROPERTIES% -Dem.oracle.home=D:\Oracle\Middleware\oracle_common -Djava.awt.headless=true
    To:  set EXTRA_JAVA_PROPERTIES=-XX:PermSize=64m -XX:MaxPermSize=256m %EXTRA_JAVA_PROPERTIES% -Dem.oracle.home=D:\Oracle\Middleware\oracle_common -Djava.awt.headless=true
    Make a backup of startManagedWeblogic.cmd and then make the following modification:
    Uncomment this line:   @REM Set JAVA_VM=-server
    Comment this line: set JAVA_VM 

    Windows:
    Make a backup of the setEpmEnv.cmd (Windows) file and then make the following modification:
    Change: set JAVA_OPTIONS=%JAVA_OPTIONS%
    To: set JAVA_OPTIONS=-XX:+UnlockCommercialFeatures -XX:-FlightRecorder %JAVA_OPTIONS%

    ~~~~~~~~~~~~~~~~~~~~~~~~~~~~~~~~~~~~~~~~~~~~~~~~~~~~~~~~~~~~~~~~~~~~~~~~~~~~~~~~~~~~~~~~~~~~~~~~~~~~~~~~~~~~~~~~~~~~~~~~~~~~~~~~
    Apply Patch 18561746: ODL CAN'T PROCESS CONFIGURATION FILE WITH CERTAIN CHARACTERS IN THE PATH
    ~~~~~~~~~~~~~~~~~~~~~~~~~~~~~~~~~~~~~~~~~~~~~~~~~~~~~~~~~~~~~~~~~~~~~~~~~~~~~~~~~~~~~~~~~~~~~~~~~~~~~~~~~~~~~~~~~~~~~~~~~~~~

    ..............................................................................................................................
    Installation Instructions:
    ................................................................................................................................................

    $ opatch apply as below

    opatch.bat apply D:\Oracle\Middleware\oracle_common\OPatch\18561746 -oh D:\Oracle\Middleware\oracle_common -jdk D:\Oracle\Middleware\jdk6_036
    opatch.bat lsinventory -oh D:\Oracle\Middleware\oracle_common -jdk D:\Oracle\Middleware\jdk160_35
    opatch.bat lsinventory -oh E:\EPM\oracle_common -jdk E:\EPM\jdk160_35


    ===========================
    Start all Weblogic servers
    ===========================


    ====================
    Validate application
    ====================


    Friday, May 15, 2020

    FDMEE Error loading Namespace for id aif.launch

    Hi ,

    If we are facing "Error loading Namespace for id aif.launch" while launching the Datamanagement(FDMEE),


    Exploits in Hyperion: Error in accessing Data Management - Invalid ...


    Please follow the below steps:

    1.Deploy the FDMEE Application server
    2.Deploy the Configure web server under Foundation

    Restart the services and validate the Datamanagement.


    Tuesday, April 21, 2020

    How to Export FR Reports in PDF format

    EPM Financial Reporting – Batch Export Folder Locations

    Note: If you have never launched the FRConfig utility or get an error message, do the following step first.

    Set EPM_ORACLE_INSTANCE path

     Edit E:\Oracle\Middleware\EPMSystem11R1\products\financialreporting\bin\setInstance.cmd in notepad.

     Add your EPM_ORACLE_INSTANCE path after the equal sign, like below.


    Start the FRConfig Utility to configure the Export Folder Location

    1. Launch E:\Oracle\Middleware\EPMSystem11R1\products\financialreporting\bin\FRConfig.cmd


    2. Click MBeans tab. Expand com.Hyperion, Financial Reporting, and Attributes.


    3. Click ExportFolders.


    4. Click in the Value field and select all text (control + a) and then copy (control + c).


    5. Open Notepad and paste the value.


    6. Scroll to the end and add your new location in the following format: LOCATIONNAME=PATH.


     LOCATIONNAME is the displayed, friendly name the user will choose when scheduling a batch report in the workspace.

     PATH can be local or UNC. If UNC, use three backslashes in the front (instead of the normal two) and then two between each share and directory (instead of the usual one).

     Example UNC:


    EPM Financial Reporting – Batch Export Folder Locations

    Note: If you have never launched the FRConfig utility or get an error message, do the following step first.

    Set EPM_ORACLE_INSTANCE path

    §  Edit E:\Oracle\Middleware\EPMSystem11R1\products\financialreporting\bin\setInstance.cmd in notepad.

    §  Add your EPM_ORACLE_INSTANCE path after the equal sign, like below.


    Start the FRConfig Utility to configure the Export Folder Location

    1.    Launch E:\Oracle\Middleware\EPMSystem11R1\products\financialreporting\bin\FRConfig.cmd


    2.    Click MBeans tab. Expand com.Hyperion, Financial Reporting, and Attributes.


    3.    Click ExportFolders.


    4.    Click in the Value field and select all text (control + a) and then copy (control + c).


    5.    Open Notepad and paste the value.


    6.    Scroll to the end and add your new location in the following format: LOCATIONNAME=PATH.


    §  LOCATIONNAME is the displayed, friendly name the user will choose when scheduling a batch report in the workspace.

    §  PATH can be local or UNC. If UNC, use three backslashes in the front (instead of the normal two) and then two between each share and directory (instead of the usual one).

    §  Example UNC:

    §  Windows path: \\servername\frreportshare\departmentA

    §  Value: FR-DepartmentA=\\\servername\\frreportshare\\departmentA

    §  Example Local Drive:

    §  Windows path: E:\FRExportLocal

    §  Value: FR Export Local=E:\\FRExportLocal

    §  If you have more than one external folder, a comma will need to be between values. Example:

    §  FR Export Local=E:\\FRExportLocal,FR-DepartmentA=\\\servername\\frreportshare\\departmentA

    7.    Select the entire updated line in notepad and copy.

    8.    Paste into the value field inside the FRConfig utility and press the refresh button.

    9.    Close the FRConfig utility by clicking the X in the right corner.

    Restart Financial Reporting service for the change to take effect


    1.    Go to Start -> Run and type services.msc and click OK.


    2.    Right click on Hyperion Financial Reporting – Web Application and choose restart.

    3.    The External Folder will be listed after the Financial Reporting services are back online, which can take a couple minutes depending on your server’s performance.


    High Availability and Multiple Financial Reporting Servers

    If you have more than one Financial Reporting server in your environment, you will need to follow these steps on EACH server and restart EACH service.


     Windows path: \\servername\frreportshare\departmentA
     Value: FR-DepartmentA=\\\servername\\frreportshare\\departmentA

     Example Local Drive:

     Windows path: E:\FRExportLocal

     Value: FR Export Local=E:\\FRExportLocal

     If you have more than one external folder, a comma will need to be between values. Example:

     FR Export Local=E:\\FRExportLocal,FR-DepartmentA=\\\servername\\frreportshare\\departmentA

    7. Select the entire updated line in notepad and copy.

    8. Paste into the value field inside the FRConfig utility and press the refresh button.

    9. Close the FRConfig utility by clicking the X in the right corner.

    Restart Financial Reporting service for the change to take effect


    1. Go to Start -> Run and type services.msc and click OK.


    2. Right click on Hyperion Financial Reporting – Web Application and choose restart.

    3. The External Folder will be listed after the Financial Reporting services are back online, which can take a couple minutes depending on your server’s performance.


    High Availability and Multiple Financial Reporting Servers

    If you have more than one Financial Reporting server in your environment, you will need to follow these steps on EACH server and restart EACH service.

    Wednesday, April 15, 2020

    EPM Version 11 – What property files?


    Just before I start I would like to point out this blog is based on version 11.1.1.3 and no doubt the contents are subject to change in future versions.

    A number of times question have been raised about the location of property files in version 11. Pre version 11 there are a multitude of property files to contend with depending on the product. I have always contested why the need for so many files and it would have been useful if they were consolidated and more information provided on what they are used for, in version 11 the storage of certain property files has certainly changed.

    If you have been involved in the installation of version 11 you would of come across the Shared Services registry, this is not really to be confused with Shared Services. From the official documentation :-

    The Shared Services Registry is part of the database that you configure for Shared Services.
    Created the first time you configure EPM System products, the Shared Services Registry simplifies configuration by storing and re-using the following information for most EPM System products that you install:
    • Initial configuration values such as database settings and deployment settings
    • The computer names, ports, servers, and URLs you use to implement multiple, integrated, Hyperion products and components
    • Dependent service data
    Breaking it down the Shared Services registry is basically a set number of tables held in the Shared Services relational database, these tables hold the information that used to be stored in property files. Instead of a product opening one of the files to find out configuration settings it will query the registry tables (most of the time using JDBC) to find out the information,

    In version 9 some of the examples of these files are :-

    HBRServer.properties – contains configuration information for business rules, such as connection details to the EAS repository, this file can usually be found in the EAS installation directory and within the planning web application server so planning can connect to HBR.


    PlanningSystemDB.properties – contains connection information to the planning system repository and can be found with the planning web application server.


    CSS.xml (shared services configuration information), shared services web application server uses this file to collect information about native/external providers such as MSAD configuration details.


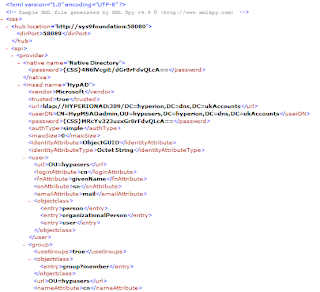
    Other products such as essbase would retrieve this information by querying Shared Services directly, if you look in the system 9 essbase configuration file you will see the url it uses to retrieve this information from HSS.


    If you put the CSS URL into a browser it will return the exact same details as the CSS.xml

    Right so there are a very small selection of some of the property files used in System 9, in version 11 these files either don’t physically exist or if they do exist they are not used anymore and the information is read from the HSS registry.

    At present it can get extremely confusing because some property files are still being used in the same way, for example many of the financial reporting .properties files are still being and are not part of the HSS registry but I am not going dwell on that today.

    When you start up any of the Hyperion products how do they know the location of the HSS registry? Well if you have a look in the EPM installation directory you will find a file called reg.properties that can be found in \hyperion\common\config\9.5.0.0\


    This file contains all the repository connection information to the HSS registry and each product now reads the file to find the location.

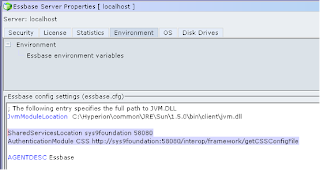
    Going back to essbase, if you have a look in the essbase.cfg in version 11 you will notice a difference from the system 9 version.


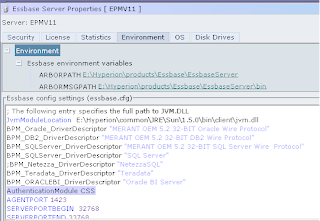
    The URL has been removed, in version 11 essbase has been updated so when started up it checks the value reg.properties and connects to the HSS registry and then retrieves the CSS information.

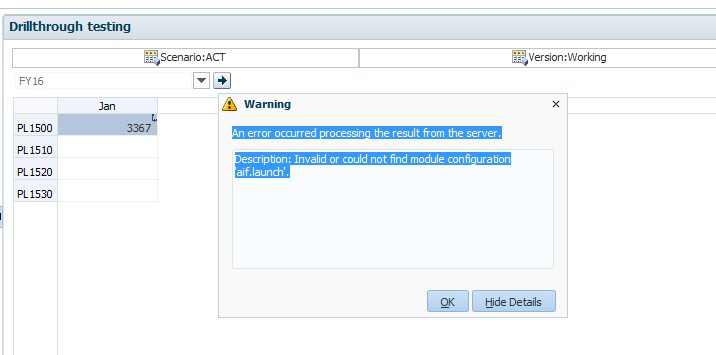
    If there is problem communicating with the HSS registry via the reg.properties information you will see something like the following in the essbase.log


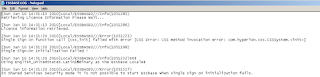
    If you do see that message it is always useful to examine the SharedServices_Security_Client.log which is in the same directory.


    Anyway back to the HSS registry and property information, if you want you want to find out what is stored in the registry you can run a script (epmsys_registry.bat or epmsys_registry.sh) in the \Hyperion\common\config\9.5.0.0, this will generate a html document (registry.html) with details of all the stored information in the registry.


    The number of properties stored can be quite extensive depending on the number of EPM products you have installed on the machine.

    Ok, so how you do you change a value of one of the properties? Well there are two official methods (yes two I am not hacking the tables which may be considered a third and dangerous option) and I will go through them both. The first and probably the quickest/easiest method is to use LCM.

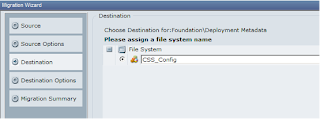
    If you logged into Shared Services, expand Application Groups and then Foundation you will see the option of “Deployment Metadata”, click on this.


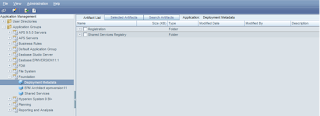
    You will see “Shared Services Registry” in the right hand pane, expanding this will drill down to the different products and property options, so let’s stick on the same track and extract the CSS information.


    The path to this is 
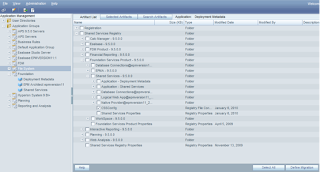
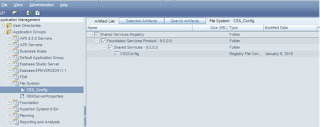
“Shared Services Registry” > “Foundation Services Product – 9.5.0.0” > “Shared Services 9.5.0.0” > “CSS Config”

    Tick “CSS Config” and click the “Define Migration” button.


    Just click through a couple of screens hitting next and then execute the migration


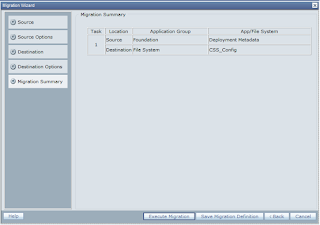
    You can launch the migration status report to see the current status of the LCM export.


    Once completed you can go to the LCM export location that will be under \hyperion\common\import_export\...


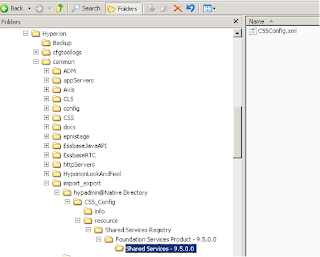
    The path created should match the path you drilled down into in Shared Services and you as you can see the CSSConfig.xml file has been created, this file is a replication of the old CSS.xml


    You can use this method to export any of the properties from the registry, so say you wanted the equivalent of the old HBRServer.properties files you would select > “Shared Services Registry” > “Essbase 9.5.0.0” > “Logical Web App@yourmachine11_10080 > “LOGICAL_WEB_APP (Logical Web App Properties)”


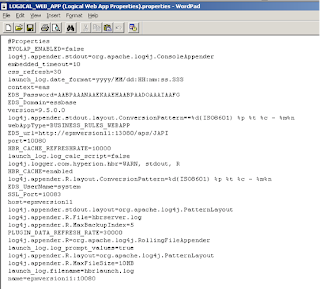
    It is pretty much the same as the old HBRServer.properties file except it does not include the database connection details as they are stored under (Database Connections).

    Once you have edited your property file it is pretty much straight forward to import it back into the HSS registry using LCM.


    In Shared Services expand 
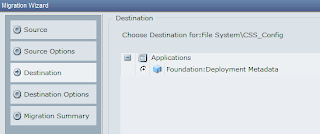
“Application Groups” > “File System” and select the name to used in the LCM export. Tick the value in the right hand pane and “Define Migration” button.


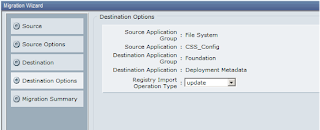
    On the destination Options screen select the Operation Type of “update” as the details already exist in the registry and we just want to overwrite them.


    Then it is just really executing the migration and all being well the properties will be updated in the registry.

    That is the LCM method but say Shared Services was down for some reason, say the MSAD details were now incorrect and it was stopping Shared Services from starting up, you still need to access the CSS information and this can be down using a command line route. It is using the same batch script (epmsys_registry) that was run earlier to generate the html report.

    The command line for exporting information from the registry is :-

    epmsys_registry view componentType

    The componentType is the full path and component name you want to export, to get this information you have to look the html report (registry.html) that we generated earlier, it does not follow the same path name as used in the LCM route.


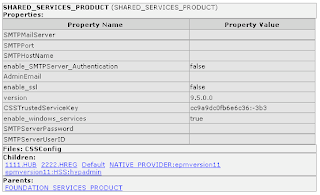
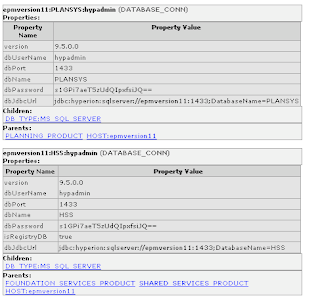
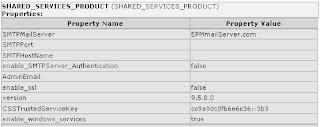
    Above is a section of the html document that has the CSS property information, so this means the component name will be CSSConfig, when addressing the component name you have you prefix it with @ so it will be @CSSConfig
    Note is also against files as it is stored as a file in the HSS registry.

    Now we have to generate the full path, the current path is SHARED_SERVICES_PRODUCT as shown in the top of the table and its parent is FOUNDATION_SERVICES_PRODUCT as shown at the bottom of the table.

    So we now have FOUNDATION_SERVICES_PRODUCT/SHARED_SERVICES_PRODUCT/@CSSConfig

    But this is not the full path if you click the FOUNDATION_SERVICES_PRODUCT link it will take you to its parent.


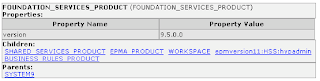
    This has a parent of SYSTEM9


    SYSTEM9 does not have any parents so the full path will be

    SYSTEM9/FOUNDATION_SERVICES_PRODUCT/SHARED_SERVICES_PRODUCT/@CSSConfig

    We can now use the command line operation :-

    epmsys_registry view SYSTEM9/FOUNDATION_SERVICES_PRODUCT/SHARED_SERVICES_PRODUCT/@CSSConfig


    Running this command line will generate a file in the same directory as the command line utility


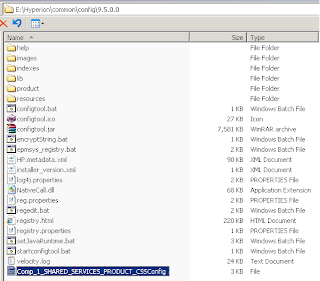
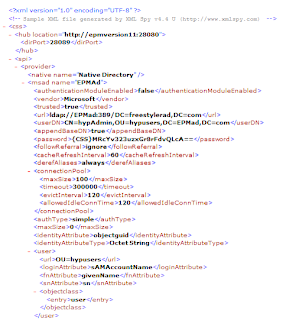
    The file in this case is exactly the same as CSS.xml or CSSConfig.xml and can be edited with any text editing application.

    Once the file has been updated the syntax to import the file back into the registry is :-

    epmsys_registry updatefile componentType componentValue

    Which in this instance negates to :-

    epmsys_registry updatefile SYSTEM9/FOUNDATION_SERVICES_PRODUCT/SHARED_SERVICES_PRODUCT/@CSSConfig Comp_1_SHARED_SERVICES_PRODUCT_CSSConfig


    The file is loaded back into the registry overwriting the existing one.

    If you want to view/update a property that is not file related then it is pretty much the same process except the syntax is slightly different to update.


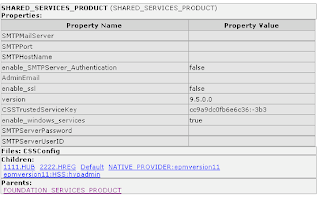
    Say we want to view the property value for the SMTP Mail Server, to view the property would be exactly the same as before :-
    epmsys_registry SYSTEM9/FOUNDATION_SERVICES_PRODUCT/SHARED_SERVICES_PRODUCT/@SMTPMailServer


    As it is file related the value is just outputted to the command line window.

    To update the property value then the syntax is :-

    epmsys_registry updateproperty componentPath/@componentProperty value

    If I want to update the SMTP Mail Server property to be EPMmailServer.com then I would use the following command line

    epmsys_registry updateproperty SYSTEM9/FOUNDATION_SERVICES_PRODUCT/SHARED_SERVICES_PRODUCT/@SMTPMailServer EPMmailServer.com


    To make sure that the property has definitely been updated you can just generate the registry report again.


    Right, hopefully you kept with me and have understood about the Shared Services registry and know how to update properties if you ever have to.